You have a mascot you like. It came out of one good generation: a round panda with a bamboo stalk, the right eyes, the right blush on the cheeks. Then you ask for the same panda from the side, or laughing, or mid-word, and a different animal comes back. The eyes drift, the ears move, the proportions change. Every new pose is a new roll of the dice, and you spend the afternoon squinting at thumbnails trying to decide which one is "close enough".
Getting it to move is worse. A talking mascot for an onboarding screen or a stream overlay usually means exporting layers, opening a separate rigging tool, rebuilding the character by hand, and hoping the file survives the trip back. Most people never get past the still image.
What changed
1DesignTool 1.11.0 adds a workspace for Character Design. Now you can lock a character's identity from one concept image, build every sheet from that locked face, and rig the same character as a 2D puppet, without leaving the project or starting over in another tool.
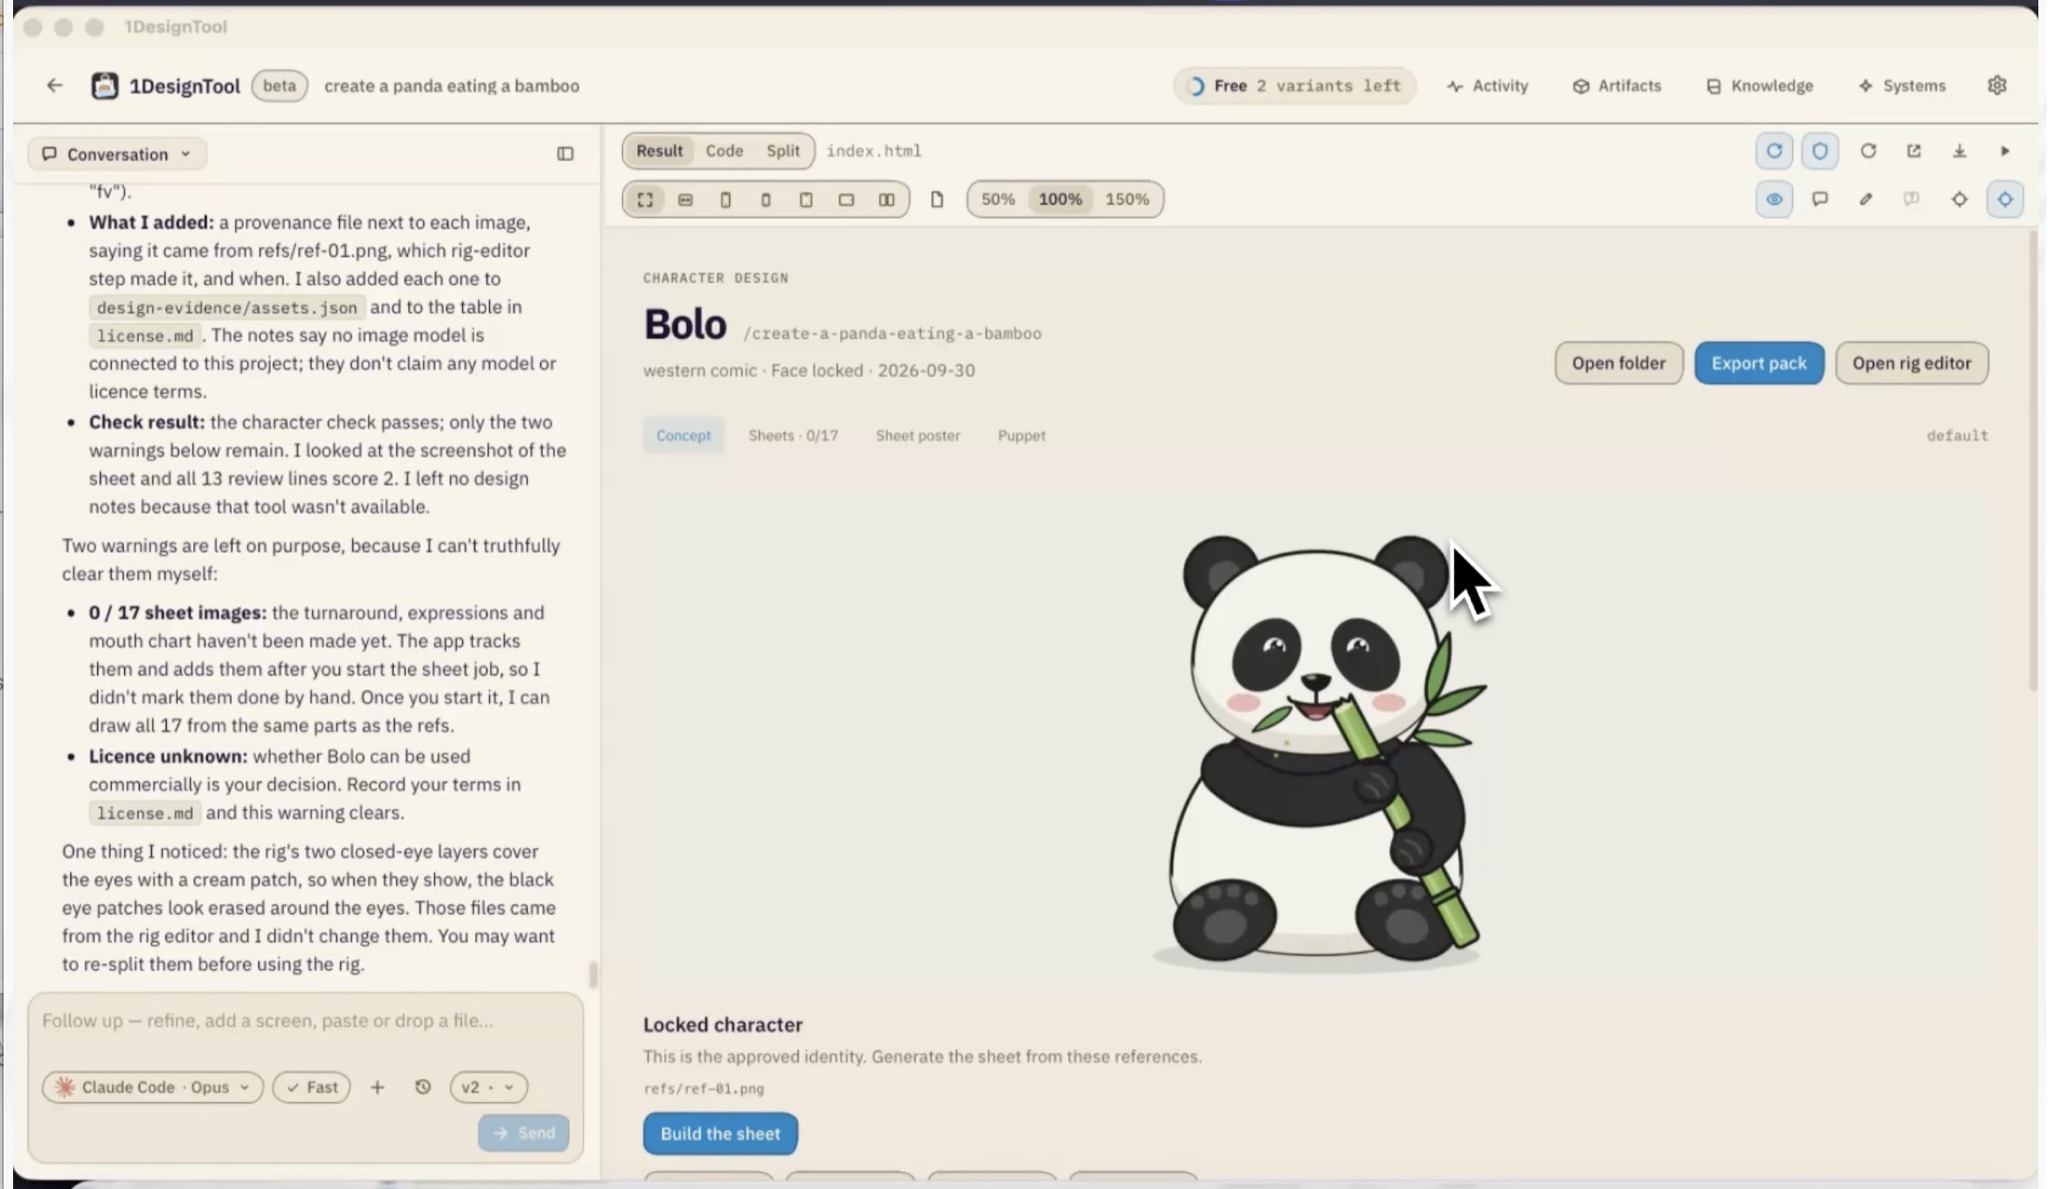
Pick the Character Design tile in the Creative group on the home screen and describe who you want. The project opens on a character page instead of a plain preview: the name, the style, whether the face is locked, and four tabs across the top. Concept, Sheets, Sheet poster and Puppet.
How it works in practice
Lock the face before anything else gets drawn
The workspace starts from a concept. Once one exists, Review and lock face asks you to choose the canonical references: Choose 1–12 images. After Lock, these refs stay immutable; change the face by forking. That rule is the whole point. Every sheet the character gets later is generated from those pinned references, so the turnaround and the expression chart are drawn from the same face instead of a fresh guess each time.
The page says where you are in plain words. Before the lock it reads Review this character, then lock the face to generate the sheet. After, it reads This is the approved identity. Generate the sheet from these references. A character that only has a generated reference so far opens on a large Concept view, so you are never staring at an empty grid of pending sheets wondering what went wrong.
If you later want a different face, you don't overwrite the locked one. Fork character makes a new character that starts from the current state, and the original stays as it was.
Build the sheets, and approve each batch before it runs
Build the sheet plans the full set: turnaround, expressions, mouth chart, eye chart, story poses and alternate appearances. The Sheets tab counts them as you go (Sheets · 0/17 on a fresh character).
Nothing expensive runs without you. Each proposed job opens for review first: Edit the title, output items and 1–3 candidates per item. The cost estimate updates before you start. You can edit the job, drop it, or start it. When the candidates come back, Choose candidates shows them side by side, and Use this candidate saves the one you want into the character folder as a real file. Reject with reason records why the others missed, and that rejection is saved as a knowledge proposal for the project, so the next batch has a better idea of what you meant.
Completed batches get their own consistency review, shown as model opinions with a prompt to confirm the identity yourself. The review is advice; the lock is still your decision.
The character bible travels with the artwork
The page keeps the character bible, style lock, delivery status and rights beside the pictures. Where each image came from is recorded with the asset, and the licence is a file you can read and edit. If you haven't set terms yet, the page says Licence unknown instead of assuming you can use the character commercially.
Image generation goes through an image connection you choose: either a discovered tool on one of your MCP connections, or the Director runtime's own image tool. If none is connected, the agent says so and doesn't pretend otherwise.
Rig it as a puppet from the concept you already have
This is the part that used to need a second app. Open the Puppet tab and press Open rig editor. The Character rig editor starts from the character's concept image, so there is no layer export step to get through first. Or you can Import PNG layers if you already have named parts.
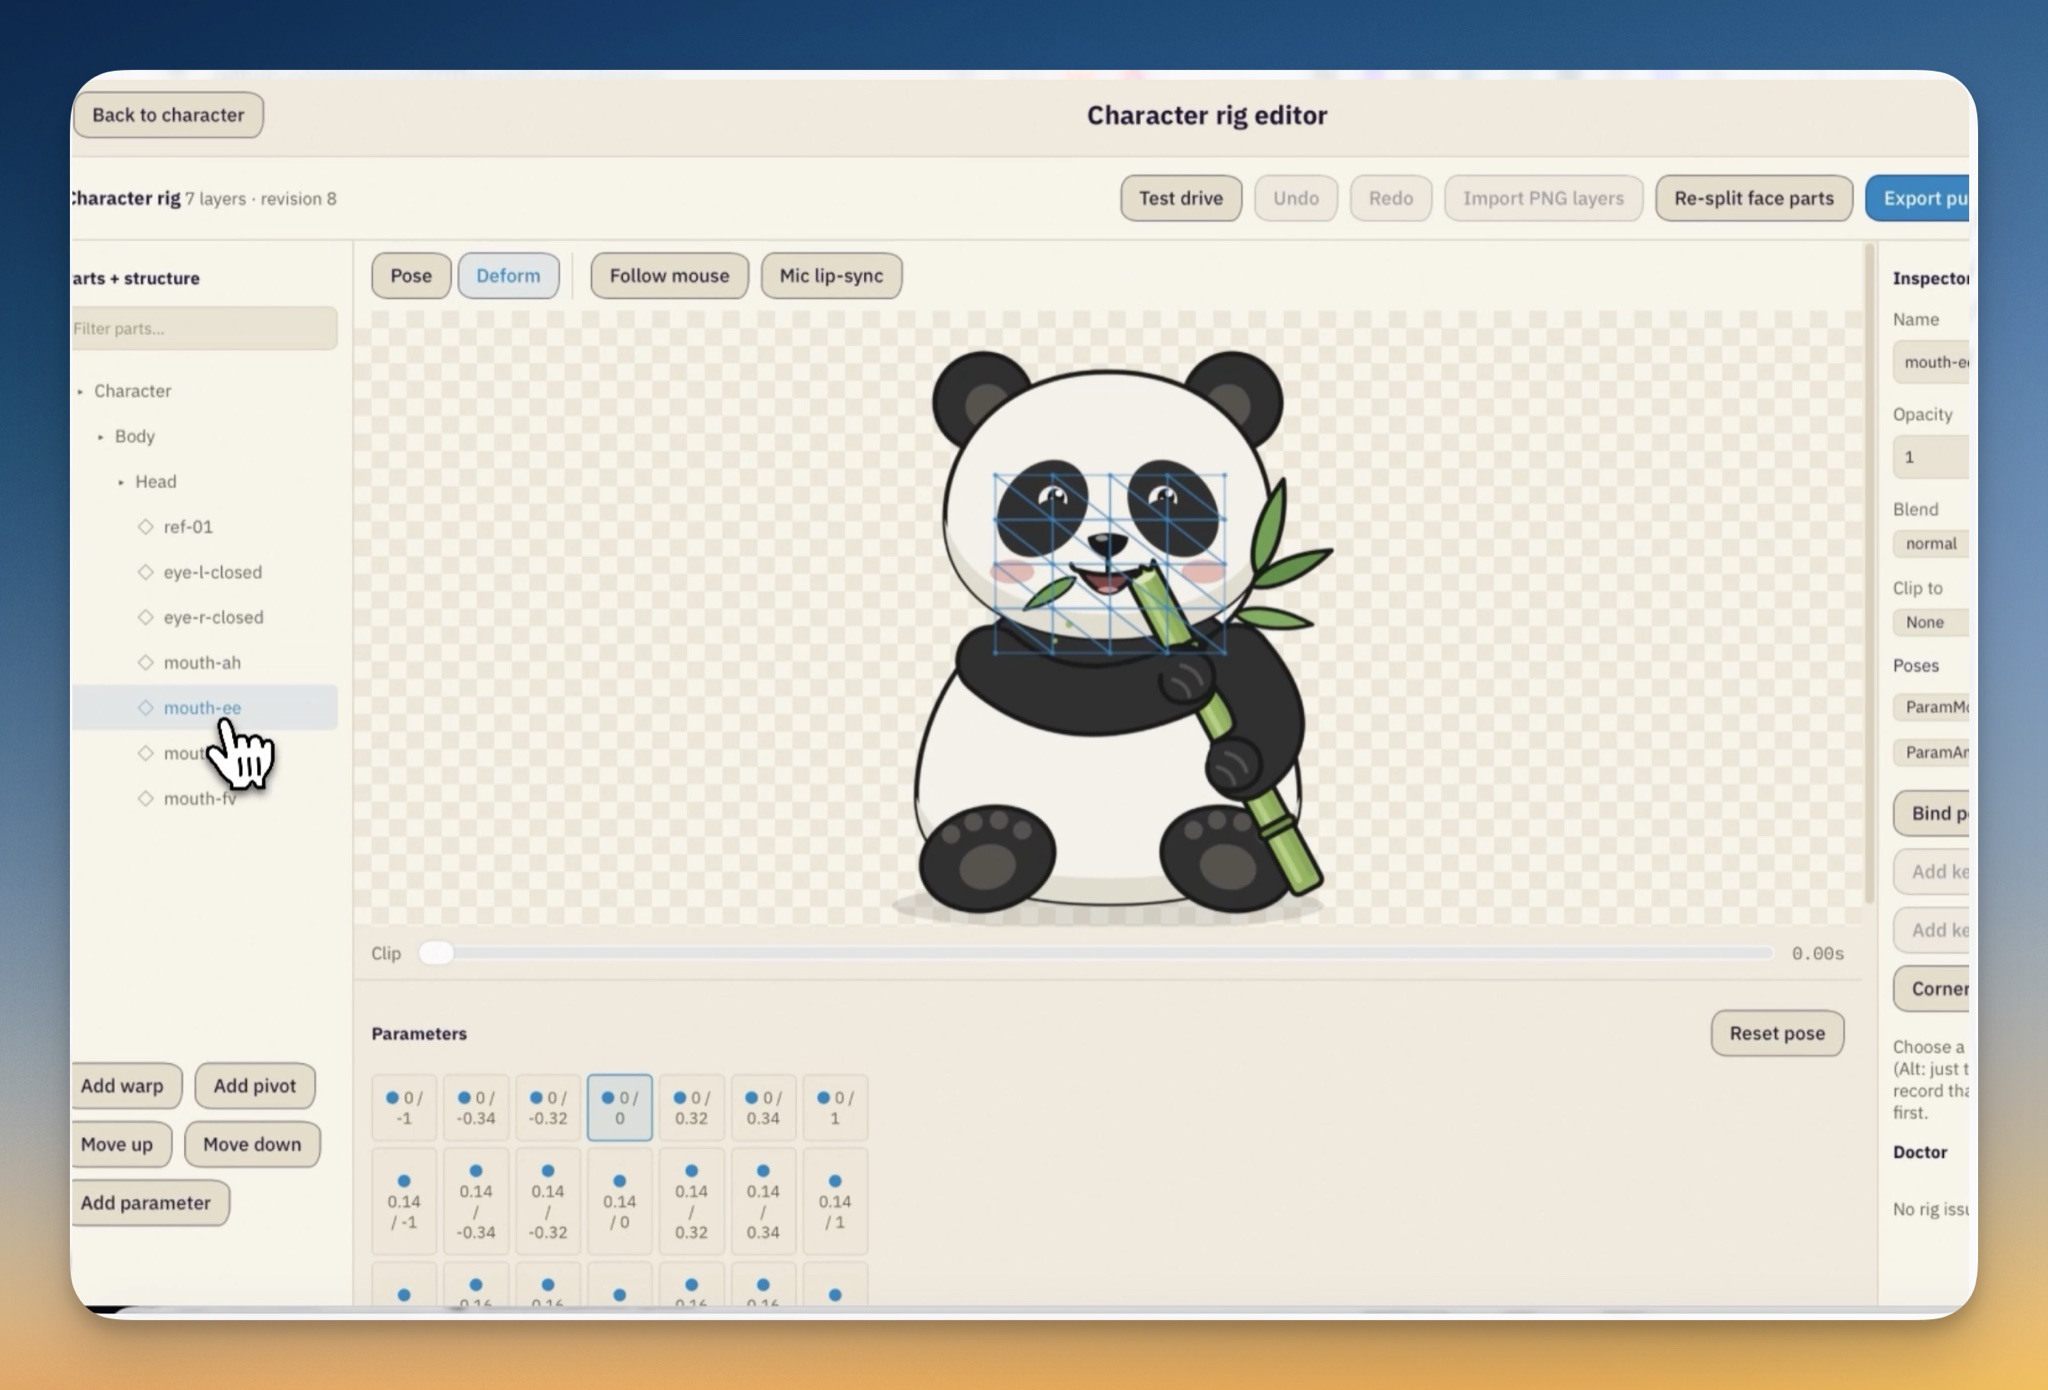
The toolbar has two canvas modes. In Pose, you drag the character to turn and tilt its head and body. In Deform, you move lattice handles to reshape a part. Split face parts marks the eye and mouth regions and cuts them into their own layers, which is what gives you blinks and talking shapes. In the shot above that produced eye-l-closed, eye-r-closed and mouth shapes like mouth-ah and mouth-ee in the part tree. If a split came out wrong, Re-split face parts redoes it.
The rest is what you would expect from a rigging tool, in one window:
- Add warp and Add pivot wrap a layer in a deformer; Move up and Move down change the layer order.
- The inspector sets each part's name, opacity, blend mode and clipping mask.
- Add parameter creates a control, and the Parameters grid stores a keyform at each value so the slider interpolates between shapes you drew.
- Doctor checks the rig and says No rig issues found. when it's clean.
Edits support undo and redo, and you can save a rig checkpoint as a version to return to. Puppets built before this release offer an undoable rebuild with the new head and body deformers.
Test it with your mouse and your voice
Test drive plays the rig live. Follow mouse makes the head track your cursor, and Mic lip-sync drives the mouth from your microphone's volume, so you can hear whether the mouth shapes read before you export anything.
Export something another app can open
Export puppet writes a portable HTML puppet or runtime JSON, and only after the rig passes validation and the keyforms reload cleanly, so the file you hand off is one that actually loads. With FFmpeg installed locally, you can also record the puppet as a transparent WebM for video editors and overlays.
Export pack in the character header bundles everything, including the rig and puppet files, into a single .charpack. Import it on another machine or into another project and the pinned identity comes with it. Agents you have granted access can read registered characters through read-only MCP tools, so a coding agent building your onboarding flow can reuse Bolo instead of inventing a second panda.
This is the first version of the rig editor. PSD and Inochi2D import and export are not in it yet.
Before vs After
| Step | Before | With 1.11.0 |
|---|---|---|
| Keep the character consistent | Regenerate until one looks close enough | Lock 1–12 references once; every sheet is drawn from them |
| Build turnaround and expression sheets | One prompt at a time, compared by eye | One planned job, 1–3 candidates per item, you pick each keeper |
| Know if you can use it commercially | Remember where each image came from | Provenance and licence stored with the character |
| Make it move | Export layers, rebuild the rig in another tool | Open rig editor from the concept, split face parts, pose |
| Check the lip-sync | Export, import, play | Mic lip-sync live in the editor |
| Hand it off | A folder of loose PNGs | A validated HTML or JSON puppet, a transparent WebM, or one .charpack |
Who benefits most
Indie developers who need a mascot. You get the stills for the store page and a puppet for the onboarding screen from the same locked character, and the pack means the next project starts from the same panda.
Streamers and video makers. A mouse-follow, mic-driven character exported as a transparent WebM drops straight into an overlay or an edit.
Teams using agents to build product UI. The character becomes something agents can look up and reuse through MCP, instead of a PNG someone has to find in a chat thread.
Try it
Update to 1DesignTool 1.11.0, choose Character Design on the home screen, and describe the character you have in mind. Lock the face once, and every sheet and every pose after that starts from the character you already chose, instead of hoping the next generation looks like it.